HOW TO SCALE A PRINT. On my website, the size of my prints is indicated below each thumbnail and is for the IMAGE ONLY. If you wish to order a size where the art is larger or smaller than the website specification, here's how you do it. All prints are shipped rolled, unframed and are printed with ample border to accommodate your matting. If you have access to a proportion wheel, it's cheating, but a bit easier. Otherwise...
1. It's just a matter of building boxes...one for the current size and one for the size you want. Determine the dimensions for enlarging or reducing the size by first drawing a rectangular box for the current height and width. Best done with a triangle and T-square. Use the the same dimensions as shown for the ORIGINAL print image on my website.
HINT: You do not have to draw the box actual size on a huge sheet of paper, but you must be aware of the proportions you use. So, to draw a 20" x 40" inch box, you could just make it 5" x 10", a quarter of the actual size. Scale the box larger or smaller (Step #2-4). Then multiply the dimensions by whatever reduction ratio you used (4x in this case) when you send the dimensions to me. Be sure they are the actual size of the new dimension.
Need help? If you have some sizing issues, let's talk.
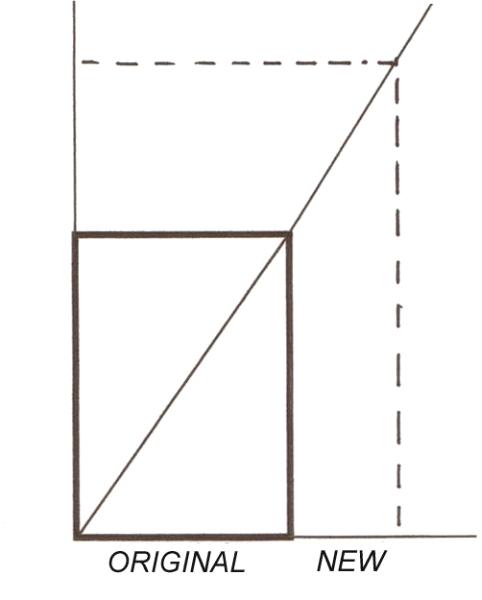
2. To determine the dimensions of a larger print than the website specification, extend the base line of the box to the right horizontally until you reach the desired total measurement including the original box. Then draw a vertical line extending the left side of the box vertically. You now have the original box sitting in the corner of the larger "L-shaped" area you drew.
3. Next, draw a line from the lower left corner of the box to the upper right corner and let the line extend on through the upper right corner. Make this at least as far as the base line extension you made in #2, earlier.
4. Almost done and after once, you'll be a 'pro'. To finish the enlargement, mark the new desired width on the base line. The distance should include the width of the original base plus what you added to the baseline of the original box and be equal to the desired width of the new image you are ordering. Mark the point on the line. From that point, draw a vertical line perpendicular to the base until you intersect the diagonal line you drew earlier. Now, connect that intersection horizontally to the left vertical line. You now have a box that represents the NEW size of the image with the width and height you want. Order your print with the dimensions of the NEW box.
To scale the original print smaller, draw the diagonal as above, but you don't need to extend any lines beyond the borders of the original box. Begin to build the smaller box inside the original. Measure and mark the new base line and draw a vertical line from the base point (new width) to the diagonal to determine the new height. Connect the the top line of the box to the left vertical line.
CONGRATULATIONS! Remember that you are giving me the dimensions of the image in the new box (larger or smaller), only, not the finished frame or mat. IF YOU DO NOT INTEND TO MAT THE PRINT, GIVE ME THE SIZE OF YOUR FRAME SO YOU'LL GET ENOUGH SHEET TO FIT. Please include your email so I can double-check, if I need to.